Topics: Linux, Raspberry Pi
My Raspberry Pi arrived in the mail earlier this week. However, work, family, and other commitments meant that tinkering with it had to wait until the weekend. Until today, all that I managed to accomplish was to download a Debian-based OS image, flash it to an SD card, hook the board up to my TV, and squeal with joy as it booted.
Now I'm ready to dig into this diminutive computer and see what's going on inside, but I have a slight problem. The Pi has only HDMI and composite for video output and it turns out that I have nothing in my office which can display video from either of these. (You can supposedly buy an HDMI to DVI adapter, but I don't yet have a DVI-capable monitor either.) This basically leaves me with two choices: Log into the Pi via SSH over ethernet or connect a serial console.
SSH would work just fine in theory, but there are two major drawbacks:
- You don't get any feedback on the boot process. If the operating system doesn't come up far enough to configure the ethernet port, give it an IP address, and then run the SSH daemon, I'll have to go and hook it up to something else to debug it. Which is clearly obnoxious.
- The Debian image that I installed doesn't run an SSH daemon by default.
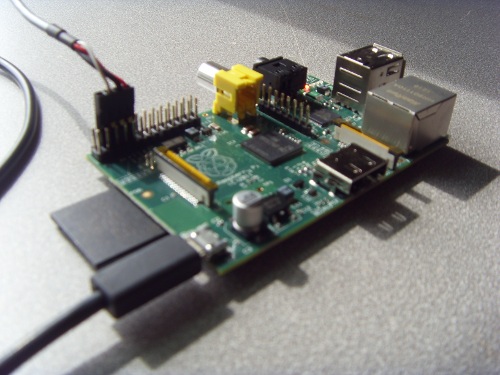
So that leaves us with the serial console. The Pi has two rows of headers for general-purpose IO (GPIO). Three of these pins double as a serial port: ground (GND), receive (RX), and transmit (TX). The protocol is the same one spoken by standard 9-pin RS-232 ports on PCs, but you cannot connect them directly to a PC's serial port because the voltage levels are different. You'll basically fry your shiny new uber-cheap Linux board. And it wouldn't even make a very serviceable doorstop.
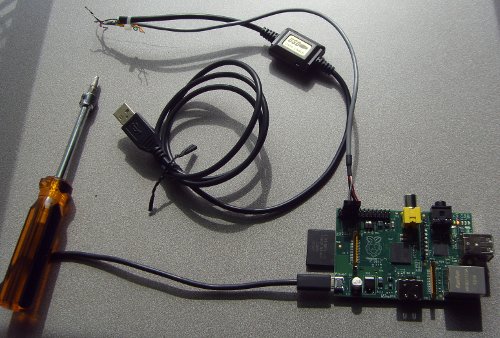
You need a special cable with a bit of circuitry in it to do the level conversion. I happen to have one that I bought off eBay for a couple bucks to do wifi router hacking. It's just a cell phone data cable which I spliced a CD-ROM audio cable connector onto. Finding the right cable can be tricky since these aren't as common anymore. Just make sure you get one that converts to 3.3V, not 5V. The OpenWRT wiki has some suggestions. If you don't want to hunt around, just buy this one from Adafruit. Either way, you'll probably have to do some wire-splicing since there is no standard connector or pin arrangement for this.
This image shows the pinout for the Pi's GPIO header. The serial cable is connected to pins 6 (GND), 8 (TX), and 10 (RX). Remember that you have to connect the cable's TX wire to the Pi's RX pin, and the cable's RX wire to the Pi's TX pin.
Once the hardware is sorted, the rest is easy. Just plug the cable into your computer. Run the dmesg command to see how your system recognized the level converter. In my case, these were the relevant messages:
[125827.544373] usb 1-6.1: new full-speed USB device number 9 using ehci_hcd
[125827.663087] usbcore: registered new interface driver usbserial
[125827.663120] USB Serial support registered for generic
[125827.663202] usbcore: registered new interface driver usbserial_generic
[125827.663208] usbserial: USB Serial Driver core
[125827.665650] USB Serial support registered for pl2303
[125827.665717] pl2303 1-6.1:1.0: pl2303 converter detected
[125827.667643] usb 1-6.1: pl2303 converter now attached to ttyUSB0
[125827.667684] usbcore: registered new interface driver pl2303
[125827.667689] pl2303: Prolific PL2303 USB to serial adaptor driver
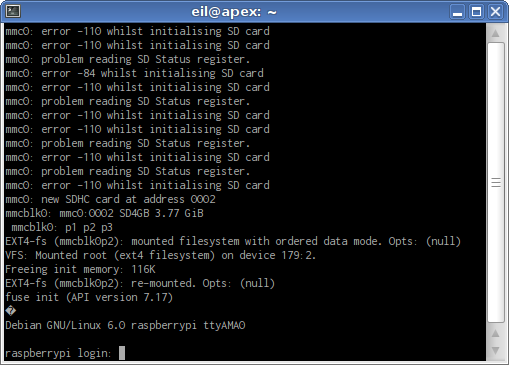
This is showing that the kernel recognized the device, set up the pl2303 driver, and then attached it to the character device /dev/ttyUSB0. In most cases, this will be the device you'll see too.
I previously used minicom to talk to serial ports, but recently found out that GNU screen works just as well. Just run this command as root, power up the Raspberry Pi, and away you go:
screen /dev/ttyUSB0 115200
(Depending on how your Linux distribution and account are set up, you may be able to use sudo or add your account to the dialout group.)
If all goes well, you'll see a flurry of kernel messages scroll by, followed by a login prompt. Success!
F.A.Q.
Q: Holy Moses, this doesn't work at all!
A: Probably the trickiest part in all of this is connecting the serial cable to the right pins on the Raspberry Pi. The good news is, you aren't likely to blow anything up by connecting them the wrong way. With only three pins, there aren't that many different combinations, so just try them all. The ground wire is probably going to be easiest to find, so try to connect that one first and then you have only two combinations to try.
Another strategy (one I have not tried) might be to plug the Raspberry Pi's power cable into your PC's USB port or a powered hub. (The docs warn against this but if you don't have any peripherals connected to the Pi and aren't running any CPU-intensive programs, you should be fine.) This connects the Pi's signal/power ground to the computer's signal ground so you then only have to worry about the RX and TX pins. Once you've figured them out, go back to powering your Pi with a cell phone or USB charger.